Determination of Silver in Water and Wastewater: Photometric Determination Using Phenanthroline Method and Eosin Y
Introduction
Silver determination in aqueous samples is performed mainly for two reasons: (a) recovery from technical or industrial solutions for economic purposes or (b) to prevent negative health impacts on humans if the water is subjected to drinking water supply chains.
The silver concentration in groundwater and surface water is very low, due to the insolubility of the silver metal and most of the silver salts. Typical concentrations in surface water are 0.3–1.3 µg/L. Higher concentrations are caused by industrial sources like photography labs or electroplating factories. Due to the fungicidal and bactericidal effect of silver, it is also used for water disinfection respectively water conservation in water storage tanks in an expected concentration range of 50–100 µg/L.
This application note describes a photometric method that was formerly available as Spectroquant® Silver Test (1.14831) which is now discontinued. The method with a measuring range of 0.25–3.00 mg/L Ag is suitable to determine the silver concentration in wastewater, especially from the photography industry and from electroplating factories or for in-process control purposes.
Experimental
Method
In weakly acidic solution silver ions react with 1,10-phenanthroline and eosin Y to form a red complex that is determined photometrically at 550 nm.
Measuring Range
0.25–3.00 mg/L Ag in a 10-mm rectangular cell
Sample Material
Wastewater, especially from the photography industry and from electroplating factories or in-process controls
Note: This method is not suitable for seawater.
Influence of foreign substances
Other components in the sample - than the target analyte Ag - may interfere with the detection chemistry described here. Some of them were checked in solutions containing 2 and 0 mg/L Ag. The determination is not yet interfered with up to the concentrations of foreign substances given in the table. The values given in parentheses apply to samples that were digested as described in the “sample preparation” step.
Reagents, Instruments, and Materials
Reagents
- Sulfuric acid 25% for analysis EMSURE® (1.00716)
- Silver standard solution 1000 mg/L (1.19797)
- Potassium peroxodisulfate (1.05092)
- Ammonia solution 25% for analysis EMSURE® (1.05432)
- Dimethyl sulfoxide for analysis EMSURE® (1.02952)
- Eosin Y (230251)
- Polyvinyl alcohol 8-88 EMPROVE® (1.41351)
- ProClin™ 300 (48912-U)
- Titriplex® III (1.08418)
- 1,10-Phenanthroline chloride monohydrate (1.07223)
- Sodium acetate (1.06268)
- Potassium sodium tartrate tetrahydrate (1.08087)
- Nitric acid 65 % for analysis EMSURE® (1.00456)
- MQuant® Universal indicator strips pH 0 - 14 (1.09535)
- Water for analysis or tap fresh from an appropriate Milli-Q system (1.16754)
Instruments
For silver measurement one of the following Spectroquant® photometers is necessary:
- Spectroquant® VIS Spectrophotometer Prove 100 plus (1.73026)
- Spectroquant® UV/VIS Spectrophotometer Prove 300 plus (1.73027)
- Spectroquant® UV/VIS Spectrophotometer Prove 600 plus (1.73028)
Software for Data Transfer
- Optional Spectroquant® Prove Connect to LIMS software package (Y.11086) to transfer your data into an existing LIMS system.
Instrument Accessories
Other Reagents and Accessories
- Pleated filter 595 1/2
- Pipettes for pipetting volumes of 1.0 and 10.0 mL for the analysis
- Pipettes for pipetting volumes of 0.25 to 5.0 mL for the preparation of calibration standards
- Volumetric flask 50 and 100 mL for the preparation of calibration standards
- Standard laboratory glassware (measuring flasks, beakers, etc.)
Analytical Approach
Reagent preparation
- Reagent 1: Sulfuric acid 25%
- Reagent 2: Potassium peroxodisulfate
- Reagent 3: Place 14.3 g (14.3 mL at 20 °C) of water for analysis in a suitable glass vessel and carefully add 8.7 g (9.63 ml at 20 °C) of ammonia solution 25 % while stirring.
- Reagent 4: Place 7.0 g (6.36 mL at 20 °C) of dimethyl sulfoxide in a suitable glass vessel and add 0.046 g of eosin Y while stirring. Stir until everything is fully dissolved.
- Reagent 5: Place 30.0 g (30.05 mL at 20 °C) of water for analysis in a suitable glass vessel and heat it up to 70 °C. Add slowly 1.58 g of PVA and let it stir for 2 hours at 70 °C. After the 2 hours, let the solution cool down to room temperature while stirring, and add 0.016 g of Proclinate 300. Filter the solution through a pleated filter 595 1/2. (Density at 20 °C = 1.010 +/- 0.001 g/mL)
- Reagent 6: Place 115.0 g (115.2 mL at 20 °C) water for analysis in a suitable glass vessel and dissolve 4.75 g of Titriplex® III while stirring and gently warm up to 40 °C until the Titriplex® III is fully dissolved. Stop heating but continuously stir and add 0.040 g 1,10-phenanthroline chloride, 7.25 g sodium acetate, and 7.25 g potassium sodium tartrate. Make sure that every substance is fully dissolved before adding the next one.
The amount of all reagents is calculated for 100 determinations. The reagents are stable for 2 years if stored protected from light in closed containers at room temperature (15-25 °C).
Troubleshooting: PVA quality could strongly affect the durability of the silver complex in the solution, therefore we recommend using the given PVA article and checking the calibration for every newly prepared reagent.
Standard preparation
Create User-defined Method
- For measuring it is necessary to program a User-defined Method. Go to “Methods” and click the button “new method” and choose “Concentration Method” (Picture 1).
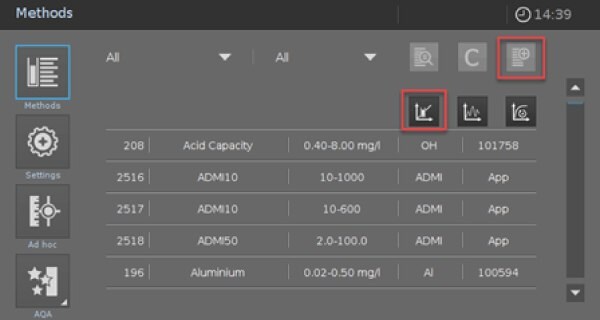
Picture 1
Picture 2
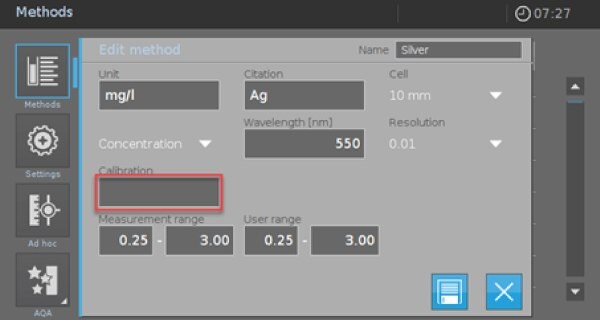
- A new method template appears (Picture 2).
- Complete the form as given in Picture 2.
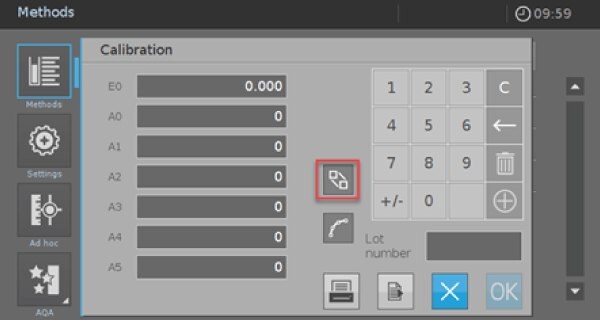
- Afterward, click on the empty “Calibration” field to enter your calibration data or perform a calibration. A new screen appears (Picture 3).
Picture 3
Picture 4
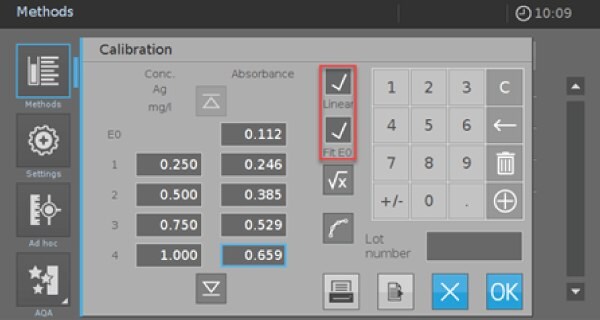
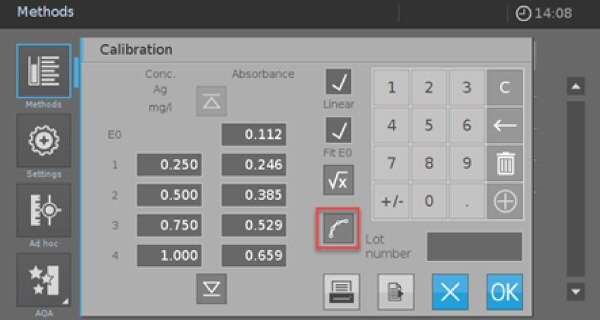
- Click on the red marked icon to enter the screen for the value pairs (Picture 4).
- Activate the check boxes “Linear” and “Fit E0”. Afterward, you have the possibility to measure or enter your own calibration data or use the data from Table 2. If you use the values from Table 2, you must check the calibration afterward with your self-prepared reagents and standards.
Hint: For additional information for the calibration of user-defined methods, please look into the Operating Manual of your instrument (Operating Manual Spectroquant® Prove, Chapter 9.6.).
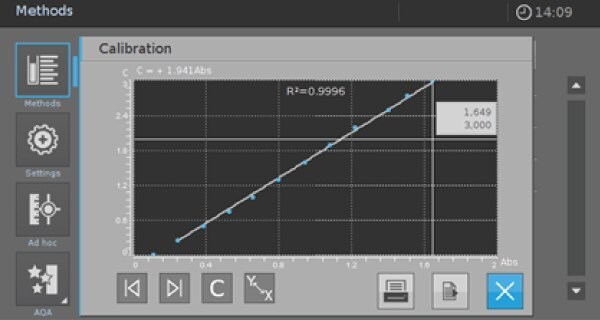
Make sure that your calibration is linear with a good fit to get reliable results. To check the linearity of the performed calibration, click on the Icon shown in Picture 5 to see a graphic function of your calibration (Picture 6).
Picture 5
Picture 6
R2 gives a good indication of linearity. But you must check in addition whether your calibration is still linear for the lower and upper limits of the measurement range.
If there are significant deviations, you must limit the measurement range and delete the value pairs for these concentrations in your calibration sheet (Picture 4 resp. Picture 5).
Sample Preparation for the determination of dissolved silver
- Analyze immediately after sampling. Otherwise, preserve with nitric acid 65 % (1 mL nitric acid per 1 L of sample solution).
- Samples containing more than 3.00 mg/L Ag must be diluted with distilled water prior to the measurement.
Sample Preparation for the determination of undissolved or complex-bound silver
- Analyze immediately after sampling. Otherwise, preserve with nitric acid 65 % (1 mL nitric acid per 1 L of sample solution).
- Samples containing more than 3.00 mg/L Ag must be diluted with distilled water prior to digestion.
- The pH must be within the range 4 - 10. Check with MQuant® universal indicator strips.
Adjust, if necessary, with sodium hydroxide solution or sulfuric acid. - Filter turbid samples.
Digestion for the determination of undissolved or complex-bound silver (wear eye protection!):
- Pipette 10 mL pretreated sample into an empty cell.
- Add 0.100 mL Reagent 1 with a pipette and mix.
- Add 0.05 g Reagent 2, close the cell tightly, and mix.
- Heat the cell at 120 °C in the preheated thermoreactor for 60 min. Allow the closed cell to cool to room temperature in a test-tube rack.
- Do not cool with cold water! Shake the cell before opening.
- Add 0.150 mL of Reagent 3 and mix.
- The pH must be within the range 4 - 10. Check with MQuant® universal indicator strips.
Adjust, if necessary, with sodium hydroxide solution or sulfuric acid. - Filter turbid samples.
- The solution prepared in this manner can be used in the further procedure without transferring it to another vessel.
Preparation of measurement solution
- Pipette 10 mL of pretreated sample (10–40 °C) into a test tube*.
- Add 0.050 mL Reagent 4 with a pipette and mix.
- Add 0.250 mL Reagent 5 with a pipette and mix.
- Add 1.00 mL Reagent 6 with a pipette and mix.
- Leave to stand for 5 min (reaction time), then fill the sample into the rectangular cell, and measure in the photometer.
*Not necessary if the sample has been digested previously (see section “sample preparation for measurement of undissolved or complex-bound silver”). In this case, the entire solution obtained in the digestion can be used in the further procedure directly in the digestion cell.
Measurement
- Open the method list (<Methods>) and select the method.
- It is recommended to perform a zero adjustment for this method each new working day. It is recommended to use the same cell for zero adjustment and for sample measurement. In case of an expired zero adjustment the system automatically prompts a zero adjustment, otherwise, press "Settings" and select “ZERO ADJUSTMENT” from the selection list. Fill a 10-mm rectangular cell with distilled water (or water for analysis) and insert the cell into the cell shaft. After prompting, insert the filled rectangular cell into the cell compartment. The zero adjustment is performed automatically. Confirm the performance of the zero-adjustment procedure by clicking on <OK>.
- Fill the pretreated sample into a 10-mm rectangular cell and place the cell into the cell compartment, the measurement is performed automatically.
- The silver content in mg/L Ag appears in the display.
Notes on the measurement
- For photometric measurement, the cells must be clean. Wipe, if necessary, with a clean dry cloth.
- Measurement of turbid solutions yields false-high readings.
- The color of the measurement solution remains stable for at least 60 min after the end of the reaction time stated above.
- In the event of silver concentrations exceeding 5 mg/L, a precipitate is formed, and false-low readings are yielded. In such cases, it is advisable to conduct a plausibility check of the measurement results by diluting the sample (1:10,1:100).
See more applications for photometry at Protocols and Application Notes
To continue reading please sign in or create an account.
Don't Have An Account?